Bacon Avocado Chicken Salad

PEOPLE. This is SO good. Like go to the store RIGHT NOW and get what you need to make this. I just had leftovers for lunch and it was just as delicious. For those of you doing Whole 30 – put it in a lettuce wrap and you are good to go! 
 
Bacon Avocado Chicken Salad
 
3 cups shredded chicken breast (I used a rotisserie chicken)
2 large avocados – partially mashed (I ended up using 2 and 1/2)
1/2 tsp sea salt
juice of 1 small lime
1/3 cup (approx 4-5 slices) cooked and chopped turkey bacon
1/2 tsp garlic powder
1/2 tsp onion powder
 
Let chicken cool. Combine all ingredients until fully mixed. Try to keep some avocado chunks intact. Store in a zip top plastic bag with the air removed to prevent browning (I did this last night and no browning at lunch today). Refrigerate. Serve on a sandwich bun, in a tortilla, or on a lettuce leaf. I also ate this with tortilla chips. You can top with seeded jalapeños. I didn’t because I knew that would be too spicy for my kids. Three out of four kids liked it. WIN!

Chicken Pot Pie

  • 4 tablespoons butter
  • 1/2 cup diced onion
  • 3/4 to 1 cup diced carrots
  • 3/4 to 1 cup diced celery
  • 2 cloves garlic, minced
  • 1/2 to 1 cup frozen corn / peas.  I always use corn.
  • 3 cups shredded cooked chicken (I always use rotisserie chicken)
  • 4 tablespoons whole wheat flour
  • 3 cups chicken broth
  • 1 cup milk
  • 3/4 tsp salt
  • 1/4 tsp pepper, or to taste
  1. Preheat oven to 400 degrees F.
  2. In a large pan over medium heat, add 4 tablespoons of butter. Once heated add the onion, carrots and celery and sauté until it begins to soften, about 4 to 5 minutes. Add the garlic, frozen corn/peas and chicken and cook for about 2 more minutes.
  3. Sprinkle in the flour and stir just until the flour is almost completely absorbed. You can add a little more butter here if your pan gets too dry.
  4. Add the broth and milk and turn heat to high. Bring to a boil then reduce heat and simmer for about 15 to 20 minutes, stirring occasionally, until the mixture thickens a bit.
  5. Once the chicken mixture has thickened, remove it from the heat and stir in the salt and pepper.
  6. I use two pie crusts – some only use one on top of the filling mixture.  You could do either way.
  7. Bake on a rimmed baking sheet (it may spill over) until golden brown, about 20 to 25 minutes. Serve warm and enjoy!

This is so, so good.  I also love that you can easily double this recipe and share with a friend.  Or, freeze for yourself for another meal.  What would make this even better, probably, is if you made your own pie crusts from scratch.  I don’t have time for that.  As a family, we try hard to cut out processed foods.  I found a pie crust in the freezer section of earth fare that is made using very few ingredients.  Until I find the time to make my own, this is what I will use.

Pizza Buns

I love these.  One thing I have been really focusing on this past school year is cutting out as many processed foods in our house as I can.  I found this recipe, and I knew I needed to try it.  One, it looked like something I could hide some veggies in.  Two, they claim they freeze great. (My kids ate SO many this first go around that I didn’t have any to freeze – that good people.)  Three, they looked easy enough.  I went with the original recipe this first time just to make sure my kiddos liked them.  Next up, pureed veggies in the sauce!

Dough:

  • 1 1/2 cups warm water (105-115)
  • 1 tbsp sugar
  • 1 tbsp yeast
  • 1/2 tsp salt
  • 3-4 1/2 cups white whole wheat flour

In a bowl, combine the water, sugar, and yeast.  Let stand for about 10 minutes.

Add salt and stir.  Add half your flour and mix well.  Gradually add more flour until the dough pulls away from the edges of the bowl when mixing and it isn’t sticky.  Place the dough in a lightly greased bowl, voce, and let rise for 45 minutes or until double in size.  Remove dough from bowl.  Separate into three equal parts.

Prepare your pizza ingredients.  This time around I just used bacon and cheese.  I will be creative the next time!

Take one portion of the dough and roll out on a lightly greased surface.  Roll into a long skinny rectangle.  Once rolled, spread pizza sauce over the dough leaving the very edge of one of the long sides free so it will seal when rolled up.  Layer meat, cheese, and other toppings.  Begin rolling up starting at the long side where the sauce is to the edge.  Pinch edges to seal.  Now slice off equal sized rolls.

Place rolls in a greased baking dish.  Cover and allow buns to rise 30 minutes.  Bake at 350 for 25-30 minutes or until golden brown.

Pureed veggies are definitely being mixed with my pizza sauce next time.  The kids won’t notice at all!  My kids love cold pizza so I could see these in their lunches next school year!

Peanut Butter Banana Mini Muffins

Hey All!  Anyone still there??  Nicole and I are still alive, I promise.  I’m speaking for Nicole, but I think we both thought we would have more time for this as the years went on and the kids got older.  WRONG.  Nothing has been posted since the beginning of last school year.  It was a busy one, people.

But, I’m going to try and add a few this summer that I love.  So, the kids made these basically by themselves tonight.  They are super easy, healthy, and my kids love them.  WIN!!

Ingredients

  • 1 cup peanut butter
  • 2 large eggs
  • 2 med size very ripe bananas
  • 1/2 tsp baking soda
  • 1 tsp vanilla
  • 2 tablespoons honey
  • 1-2  Tb ground flaxseed
  • Optional toppings of choice: chocolate chips, raisins, coconut, etc.

Preheat oven to 400.  Place all ingredients except for toppings in a blender and blend until well mixed.  Pour batter into greased muffin tin.  Add the toppings in to each muffin and stir.  I made 24 mini muffins with this and cooked for 9-10 minutes.

I’m envisioning lots of uses for these.  Breakfast treat with some sort of protein, school lunch addition, after school snacks, travel snacks, etc.

Chocolate Zucchini Cake

I saw this pin for healthier chocolate zucchini brownies on Pinterest yesterday, and because I had a zucchini at the house and no specific plans for it, I decided to give them a try!

They turned out really good, but I’d definitely say that they’re cake more than brownies. And here’s the crazy thing: my kids have eaten this 2 nights in a row for dessert, raved like crazy about how delicious it was, and they still had NO idea there was zucchini in this until I told them. They actually love zucchini bread/muffins, but I didn’t tell them because I wanted an honest reaction to how they felt about it. (Sidenote: my not-picky, but doesn’t-really-love-desserts husband wasn’t a big fan, but he literally had one little nibble…I think with toppings he’d be won over.)

Here’s my variation on it, minus the frosting (we just spread a small amount of hot fudge, pictured below, on the top of the cake slice on our own plates).

1 C applesauce
1 C sugar
2 C flour (I followed the recommendation, doing 1 C white all purpose and 1 C wheat)
3 teaspoons vanilla extract
1/2 C unsweetened cocoa powder
1 1/2 tsp baking soda
1/2 tsp cinnamon
2 C shredded zucchini (I didn’t measure – I just used a fine cheese grater like this to shred a large zucchini) – blot a bit of moisture off the top, but don’t squeeze it dry.
 
Preheat oven to 350 degrees and grease 9×13 baking pan (glass).
 
In large bowl, mix applesauce, sugar, and vanilla together. In separate bowl, combine flour, cinnamon, cocoa, baking soda, and stir until well mixed. Add flour mixture to sugar mixture (the batter will be thick!), then fold in zucchini (the moisture from the zucchini really softens up the batter).
 
Spread evenly onto greased pan. Bake for 25-30 minutes. 
 
Top with a little chocolate syrup (Midnight Moo from Trader Jo’s), hot fudge (ours is from Aldi), salted caramel (again, Trader Joe’s)…whatever you have around! Frosting would be good, too, I just didn’t want to go to the effort or add that much fat and calories.
 
Enjoy!

IMG_3418.JPG

IMG_3422.JPG

IMG_3423.JPG

Sweet Potato Black Bean Tacos

When I saw this recipe on Pinterest, I HAD to try it immediately. And while the portion is definitely not in the “cooking for 2” category, this was the perfect meal for Matt and me to cook just for us last Saturday night…and left us with delicious leftovers for several more meals after!

My kids don’t like sweet potatoes yet (I keep trying!), but this would make a great dinner for company coming over…big portion, and really unique.

Original here, my few small tweaks to use less oil and enhance the flavors we prefer here:

1 1/2 lbs sweet potatoes, peeled and diced into 1/2 cubes (smaller cooks faster)
3 Tbsp olive oil, divided
1 1/2 tsp cumin
1 tsp paprika
1/4 tsp cayenne pepper
Salt and freshly ground black pepper
1 small yellow onion, diced (1 cup)
2 clove garlic, minced
1 (14.5) oz can black beans, rinsed and drained
1 cup frozen yellow corn, thawed and drained
2 Tbsp honey
3 Tbsp fresh lime juice
2 Tbsp chopped fresh cilantro
Corn or flour tortillas
Baby spinach or Romaine lettuce, cotija or feta cheese, diced avocados, fresh salsa or pico de gallo and hot sauce (optional)

Preheat oven to 425 degrees. Line a baking sheet with foil; place sweet potatoes on foil. Drizzle with 2 Tbsp olive oil OR spray well with a Misto of olive oil and toss to evenly coat. Mix together cumin, paprika, and cayenne pepper and sprinkle evenly over sweet potatoes. Season lightly with salt and pepper to taste then toss to evenly coat. Bake in preheated oven 15 – 25 minutes until tender, removing from oven and tossing once halfway through baking.

Meanwhile, in a large skillet, heat remaining 1 Tbsp olive oil over medium-high heat. Once hot, add onion and saute until caramelized (golden brown on edges and tender), adding in garlic during last 30 seconds of sauteing. Reduce heat to medium-low, add in drained black beans, corn, honey and lime juice. Heat until warmed through. Toss in roasted sweet potatoes and cilantro. Serve over warm tortillas with desired toppings.

20140404-080756.jpg

Tortellini Vegetable Soup

So, I added this recipe a long time ago with a link.  I just went to find the recipe and realized the actual link was the title…but, it took me forever to figure that out.  Knowing that I will forget that the next time I go to look at this recipe, I just decided to repost and type the recipe out.  This is so good.  It freezes really well also.

2 tbs olive oil

1 onion, chopped

1 small zucchini, diced

1 carrot, peeled and diced

5 1/2 cups chicken stock

1 tsp dried basil

1 bay leaf

1/2 cup canned crushed tomatoes

1/2 tsp salt

8-9 ounces fresh torellini

Heat olive oil in saucepan.  Add the onion, zucchini, and carrot.  Saute for 8-10 minutes until the onion is soft and translucent.  Add the stock, basil, bay leaf, tomatoes, and salt to the pot.  Bring to low boil.  Add the tortellini and bring back to low boil.  Cook for 2 minutes, then reduce to simmer for 5-6 minutes longer.

My changes – First, I double this recipe.  The original would be great for just a couple people.  But, there’s 6 of us.  I need more.  ha!  Second, I always add more tomatoes – usually tomato sauce or paste – because I like more of a tomato flavor to this recipe.  That’s something you can decide for yourself and add what you’d like.  Also – I add frozen corn to this soup.  The more veggies I can get in it, the better!

Baked Ravioli

This is an easy one, sorta don’t even need a recipe kind of meal.   But, all my kiddos ate this and I liked the seasonings in it so I’m recording it here. 🙂

1 tbs olive oil
1 1/2 tbs minced garlic
1 tsp thyme
1/2 tsp oregano
1 can stewed tomatoes (14.5 oz)
1 can diced Italian flavored tomatoes (14.5 oz)
2 lbs ravioli ( fresh or frozen, doesn’t matter)
1/4 cup Parmesan cheese
1 cup shredded mozzarella

Preheat oven to 425. Heat olive oil in saucepan. Add minced garlic and sauté for a minute. Add thyme, oregano, and tomatoes. Bring sauce to boil, then reduce to simmer. Blend tomato chunks till chunks are gone. You could use a hand blender, magic bullet, etc. Simmer for about 15 minutes. Cook ravioli until they float atop. Pasta doesn’t need to be completely cooked as it will cook more in oven. Drain water from pasta and toss with sauce. Poor into 9×13 pan. Top with parmesan, then mozzarella.  Bake for 20 minutes, until pasta is golden.  I served with salad, bread, and smoothies.  All kiddos loved it!

Peanut butter oatmeal bars

Yet another recipe found on pinterest. I love this one for many reasons. One, it’s so quick and easy to put together. Two, it’s a great snack, breakfast food with fruit, or as a source of protein in the kids lunch. Some of my kiddos aren’t huge sandwich fans, so this is nice to put in there lunch As a sandwich alternative.   This is very rich. You won’t want to eat a big portion at once. I had a very small piece with a smoothie for breakfast this morning.

1 cup of peanut butter

1 cup honey

3 cups oatmeal

combine all together and press into 8×8 pan. Cover and let sit overnight. That’s it! Oh- and from now on I am going to add flaxseed also. Not sure why I didn’t think of doing that this time. 🙂

Crescent Rolls

I. Love. Bread. Of all kinds.

20140223-160635.jpg

I don’t like chemicals in bread, so when I saw this recipe for crescents, I decided to give it a go…I’d still been buying cans of rolls on occasion because they’re so easy, but now that I’ve made these, I won’t go back.

Yes…it takes some time to make them. BUT, one batch makes a whole lotta rolls. I baked all of them and froze the leftovers after they cooled, and they are absolutely delicious thawed and reheated, too.

I made mine a little smaller than the original recipe, which is good for portion size and for the number you’ll yield. My other changes from the original: I needed about 5 1/2 cups of flour to get to the point of the dough not being really wet and sticky. It was still a very soft dough, so I’m not sure why there was a difference (and I was nervous about having used so much), but they turned out perfect. The only other thing was that I didn’t use the Tbl of oil to coat the bowl…it’s just not necessary. And, I found the second rising time to be unnecessary, which speeds up this whole process considerably.

2 c warm water
2/3 c nonfat dry milk powder
2 Tbsp active dry yeast
1/4 c sugar
2 tsp salt
1/2 c butter
1 egg
4 1/2 – 5 1/2 c all purpose flour

In a Kitchenaid mixing bowl, stir in warm water and nonfat dry milk powder until it dissolves. Add yeast, then sugar, salt, butter, egg, and 2 cups of flour.

Mix on low speed until ingredients are wet, then 2 minutes at medium speed.

Add 2 more cups of flour, mix on low speed until ingredients are wet, then 2 minutes at medium speed. (You can switch your attachment to the dough hook at this point for easier mixing.)

Add 1/2 cup flour again, mixing on low speed until wet, then 2 minutes at medium speed. You can add an additional 1/2 – 1 c if your dough is still too wet.

Dough should be soft, not overly sticky, and not stiff.

Scrape the dough off the sides of the bowl.

Spray some plastic wrap with non-stick oil and place the plastic over the bowl. Allow it to rise in a warm place until the dough doubles in size and rises to the top of the bowl.

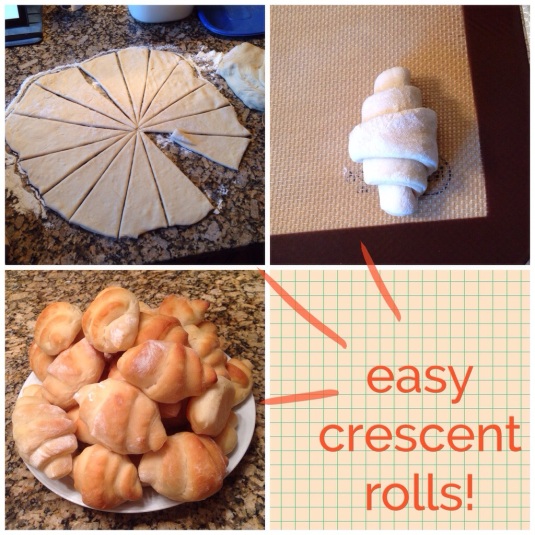
Once the dough has risen, place your dough on a flat floured surface, then divide the dough in thirds. Roll 1/3 of the dough into a circular shape, and using a pizza cutter, trim around the edges to make it into a circle (unless you are a magical fairy, there’s no way you’re going to roll this into a perfect circle). You may be able to use the scraps to make another roll or 2, so don’t throw it out.

Cut the dough into 16 pieces, like you would a pizza. Begin to roll the slice of dough in, starting from the outside. Tuck the small point under the roll.

Place on parchment-lined or Silpat-lined baking sheets.

Bake at 375 F for 15-20 minutes or until golden-brown.

If you’re freezing them, just let them cool completely before putting in a ziploc bag!

Previous Older Entries